Various manufacturers face pressure to improve productivity making it imperative to make fuller use of existing facilities and to utilize low-cost improvements to make the production process more efficient. Managers need to consult with the 4 Ms of Manpower, Materials, Machinery and Methods in their quest for increasing productivity. In this two-part article series, Paul Collyer, an international garment industry consultant with over four decades of experience, discusses about how to use methods for improving sewing production.
One common misconception is that workplace engineering is only for larger companies to increase productivity. This article is intended to include the smaller manufacturer with limited resources, who by utilizing the basic principles of movement and a little imagination, will be able to make significant reductions in garment work content at minimal cost.
Effective handling of garments by the operator depends upon both the facilities made available in the work station and the skill of the operator. Skill should be instilled into the operator by suitable systematic training in which the most efficient method of handling is explained and practiced over and over again until it becomes involuntary. This can only be accomplished if all the required components are presented in a systematic manner. When the operator has to search for a component, the automatic rhythm of his work is broken.This requirement is one of the key factors in designing a workstation layout.
If we accept that 80% of the operator’s time is spent handling garments and components during loading on to the machine, sewing, guiding under the needle and disposing them, as previously stated, it is essential to optimize the workstation so as to maximize output and reduce costs by ensuring automatic repetition of handling methods.
By analysing an individual operation, the manufacturer can adapt a workstation using very cheap materials. The key principles are:
- The component must be stored as close to the needle point as possible ensuring that it does not interfere with the sewing operation.
- It should be stored in a position so that it can be presented to the needlepoint ready to travel in the direction required, i.e. it does not need to be turned through 90 degrees or more.
- Where more than one component is worked then wherever possible the operator should be able to pick them up simultaneously.
- Wherever possible the operator should be able to grasp and release a component by only moving his arm from the elbow joint or failing that by engaging his whole arm from the shoulder and not having to move his upper body.
- Components should be stored in or as near to the same plane as the machine table.
In practice, however, whatever the operation, many operators tend to store components:
- On their knees – Usually because they do not have the facility to keep them anywhere else or out of habit. It is, therefore, necessary to lift the work to the level of the
machine bench. As fabric is not rigid, when a piece is lifted it goes ‘out of control’ and requires extra handling to position it again.
- On tables, or upturned boxes, to the right of the machine – It is not possible to load components to the machine foot from the right. Therefore, the operator has to bring work to the entire length of the machine, transfer it to the left hand and re-grasp it before presenting it to the needlepoint.
The above are simple but crucial points in minimizing handling and reducing time and are relatively easy to correct!
Examples of how to use low-cost improvements from men’s jacket production are shown below:
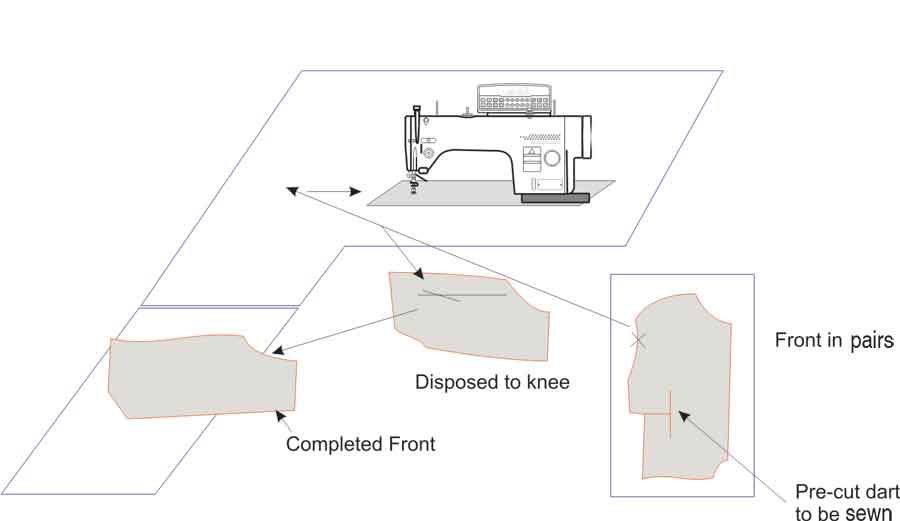
Example 1: Sew dart/front seam in jacket front
Pick up with right hand at point indicated X. Note that it is grasped on the edge but not at the point to be placed under the machine foot, thereby necessitating a reposition and re-grasp. In this operation the fronts (in pairs) are on a table to the operator’s right. The movement sequence includes:
- Move the panel across the body, turning to right side.
- Reposition on bench.
- Align dart edges.
- Move to machine foot.
- Back tack and sew dart in one burst of sewing, auto cut threads.
- Dispose by sliding onto knees.
- Move 8 – 10 fronts to storage on left.
The layout breaks the ‘rules’ as panels have to be moved across the body and up a different level panel. Additionally the panel has to be moved through 90 degrees twice as it cannot be moved across the body in any other manner. The true test is however the ‘stopwatch’. The operation was split into two elements or sections: dispose/load and sew. Using the original layout, times were for each side (in centi-minutes).
Time of Dispose/load = 0.046 centi-minutes per front (48.4%)
Time of Sew = 0.049 centi-minutes per front (51.6%)
Total (cycle time) = 0.095 centi-minutes per front
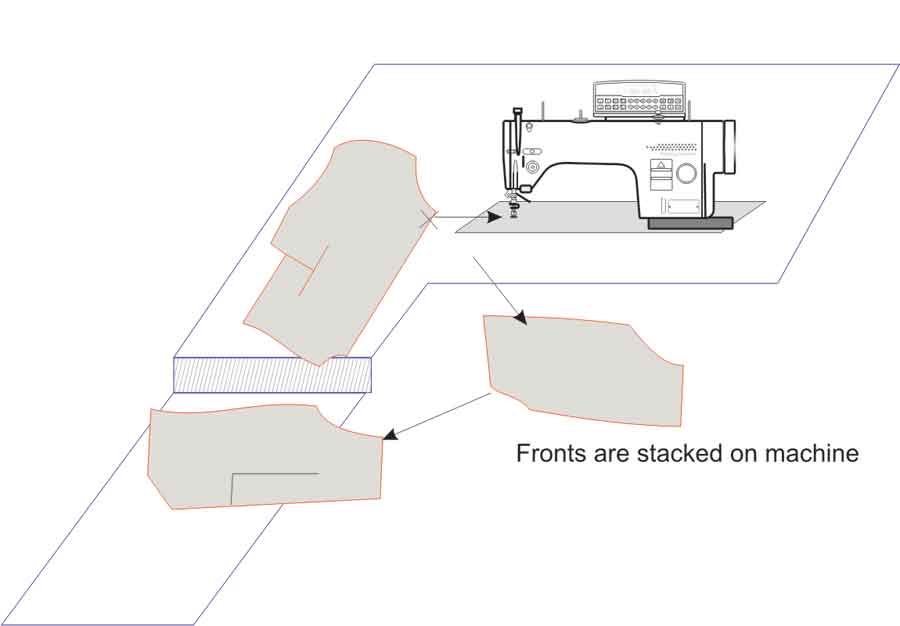
In modified layout, the operator collects the panels from the machine table to the left (with extension) and can usually work when stacked nearer to the machine foot but in this instance, as the fronts are laid in pairs, it is necessary to give sufficient space for every other one to be turned through 180 degrees. The only additional cost in this case is a small melamine extension to the table.
When the workstation was changed to Figure 2, the operators initially slowed down as they were unaccustomed to the new movements and did not work automatically. However, after practice they were able to reduce dispose/load to 0.027 – a reduction of 41.3% and 20% on the overall cycle time.
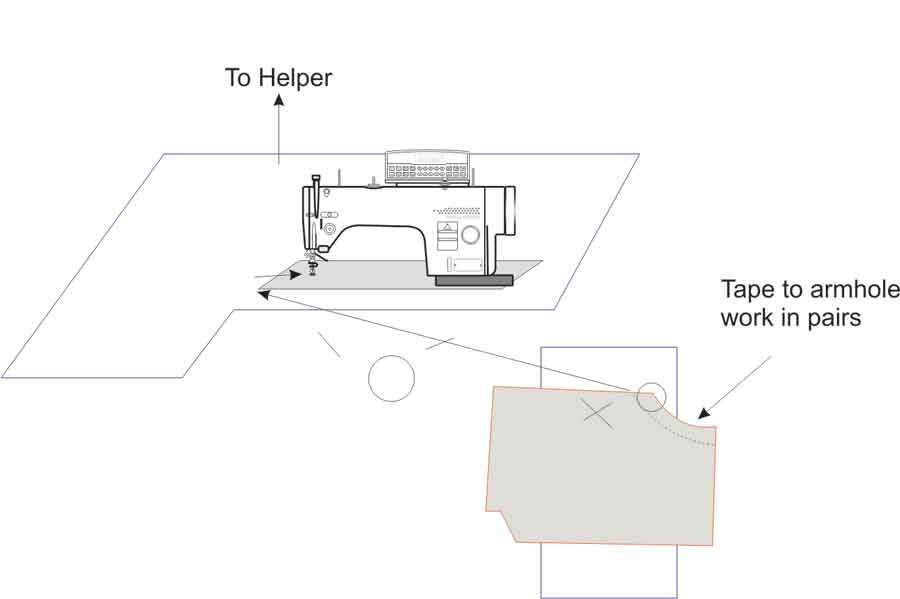
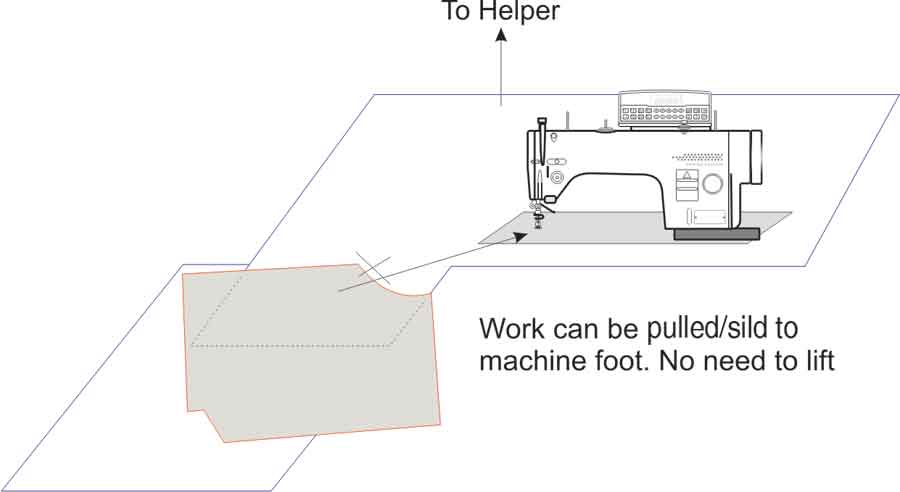
Example 2: Attach tape to front armhole
In this operation, tape is applied by a single needle lockstitch machine to the front armhole. Again the fronts are stored in pairs on a table to the operator’s right. However, disposal is by pushing forward away from the needle where a “helper” cuts and stacks. It should of course be noted that the use of a “helper” removes work from the sewing operator but doubles the standard minute content of the job. There are four approaches to the dispose:
- A high-tech solution is to fit the machine with an “impact” tape cutter and automatic stacker.
- A compromise is to fit an impact cutter and the operator disposes manually.
- The operator manually cuts the tape and disposes.
- Leave the helper in place.
There is of course no right or wrong answer – only cost/benefit analyses. What are the costs, what values are to be put through and therefore what is the payback time? However, if we forget the dispose, there is scope for improving the sewing operator’s output.

Time for load = 0.063 centi-minutes per front (25.1%)
Time for sew = 0.188 centi-minutes per front (74.9%)
Cycle time = 0.251 centi-minutes per front
In modified layout (Figure 4), the sewing element is a much higher percentage of the total, but altering the layout by extending the machine table to that shown in Figure 4 reduced load time by 0.017 to 0.046 creating an overall reduction in work content of 8% with little effort and expenditure.
A reduction of 8% may not appear worthwhile but calculated at an SMV for two jacket fronts of 0.63 for the operation for the original method an operator performing at 85% efficiency for an 8 hours/day will produce 648 pieces. An 8% increase for minimum outlay gives an extra 52 jackets per day!
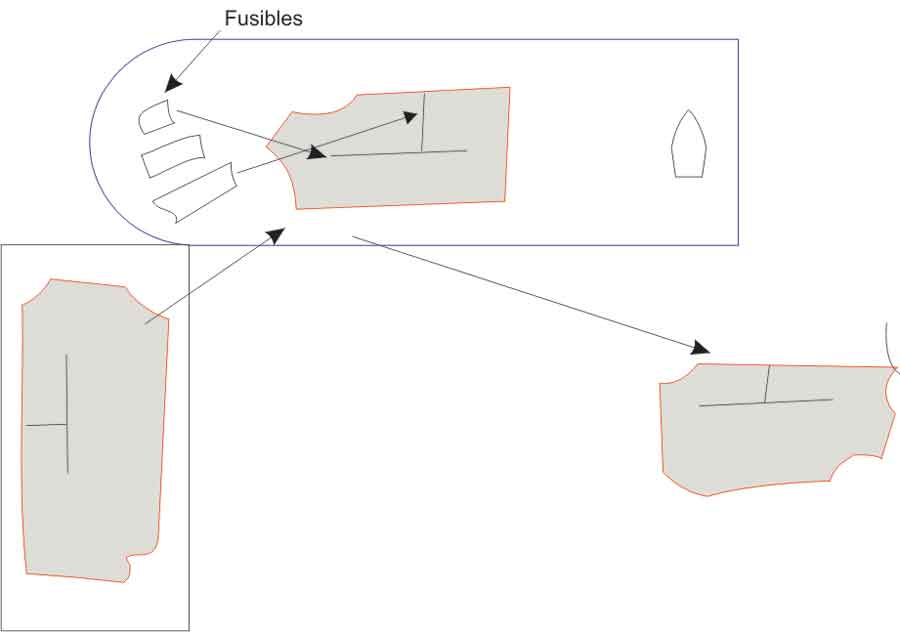
Example 3: Iron front dart
Work station engineering does not apply to sewing alone. All operations can benefit.
In this ironing operation, the front dart is opened and fusible applied to the top of the dart and the pocket opening to seal into position.
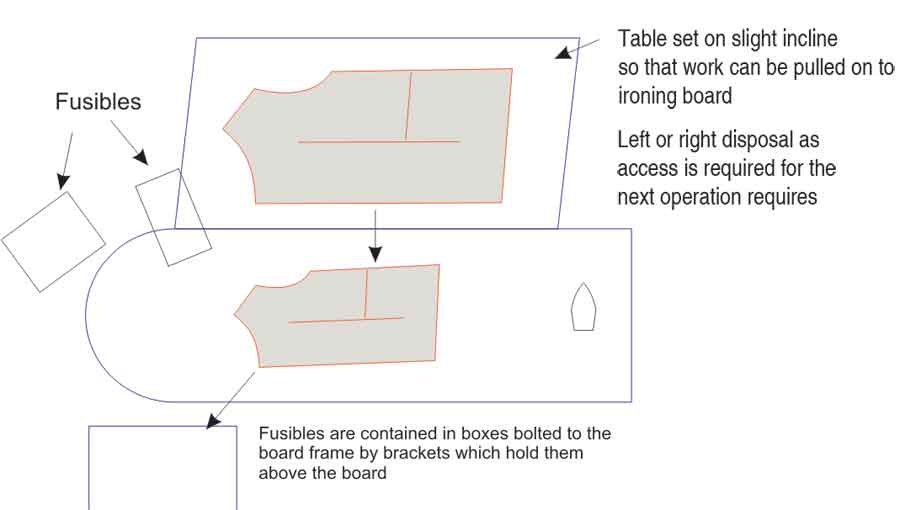
In original layout (Figure 5), the operator has positioned the work to the left and disposes to the right, a more natural movement. However, work has to be lifted, repositioned through 90 degrees and moved to the board and the cut fusibles are stored in the end of the ironing board and are prone to being knocked onto the floor. In modified layout (Figures 6 and 7), the work is kept on a slightly inclined table at rear, so that pieces can be easily slid to ironing table. Secondly, fusibles are contained in boxes slightly above the ironing board for easy access.
Timings
Dispose/load 0.10 centi-minutes per front (36%)
Iron/attach fusibles 0.26 centi-minutes per front (64%)
Total cycle time = 0.36 centi-minutes per front
New layout timings
Dispose/load 0.04 centi-minutes
per front (13.3%)
Iron/attach fusibles 0.26 centi-minutes per front (86.7%)
Total cycle time = 0.30 centi-minutes per front
A total reduction of 0.06 centi-minutes per front or 16.7%
In addition to the time savings all operators will benefit from reduced fatigue. This is particularly relevant for the ironer who is standing, working with heat and lifting all day.
However, it must be remembered that on its own, method and workstation improvements will have a marginal effect. There should be a component in a complete production management improvement programme including balancing, training and effective supervision. There is, after all no point in increasing the capacity of an operation by method improvement if the work supply is not adjusted. Also, the operator is not a machine but a human being with his own interests uppermost and will need to be ‘sold’ the new method by effective supervision and management. Experience shows that when an operator realizes a method improvement which makes his life easier, then he will be quick to grasp it. He may not, however, be so fast to embrace the concept of having to produce more garments or having his SMV reduced to reflect the new method!