An ordinary looking shirt is actually not at all ordinary when it comes to technical characteristics. Though shirt has been known as one of the most staple products for a century, it takes a lot of effort on the part of the designers and production managers to produce it. There are thousands of manufacturers and they use countless ways to manufacture a shirt according to their own understanding but the question is: Are they manufacturing a ‘quality’ shirt? May be not! This article discusses few features that are mostly overlooked by the shirt manufacturers.
A shirt should be comfortable and should fit snugly without restricting the movements of the wearer and, to achieve that comfort level, the expertise of pattern makers, effectiveness of sewing operators, and consideration of designers towards aesthetic comfort in shirt play key role. A few of the most significant features in dress shirt making are effective back pleat construction, sleeve pleat construction, placket attachment, and pocket attachment. However, it is seen that most of the manufacturers overlook these important operations.
Back Pleat…
A person’s back has a natural curve and wearing the wrong shirt can cause discomfort throughout the day. Back pleats are created to help conform the shirt to a specific body type and give the wearer more movement around the shoulders and arms. There are a number of back pleat options available including box-pleat at centre, knife pleat in two sides, and no pleat. While designing, the pleats can be used in two different ways. Sometimes, a box pleat is stitched from back yoke till waist area just for design and aesthetic purpose and there is no functional use of this kind of pleat. On the other hand, when it comes to functionality, the most important aspect to keep in mind while making a pleat pattern is the yoke height. The height should not be more than what goes across the back as when it goes beyond that limit, there will be difficulty in movement, therefore, centre back yoke height should be 4 to 4.5 inch for the desired results. While dress shirts have knife pleats at sides, the casual shirts have box pleats at the centre.
Moreover, there are a few pleats with the gatherings. The pleat on either side of the back with gathering is more preferable in shirts with heavy shrinkage. A few of the shirts made from delicate fabrics such as cotton and rayon have more shrinkage. Even after giving all the allowances for shrinkage, the shirt still has the tendency to shrink, so in that case, gatherings are given in pleats on the back.
Markedly, a classic dress shirt is one that is made without the pleat which means that every parameter and measurement right from chest, back, and bottom to collar is correct. Pleats somehow give more room for tolerance and for covering up the mistake. But, the irony is, a few of manufacturers avoid construction of back pleat considering the fact that it requires immense level of training for the finishing operators and that training never comes free of cost. Failing to iron the critical pleat area, the manufacturers indirectly make the shirt look aesthetically bad.
While driving a car, a vertical pleat stitched few inches away from the armhole may fulfil the driver’s purpose of flexibility in wrist movement. On the other hand, when he needs more space in his waist area for movement, then a box pleat may serve his purpose of comfort.
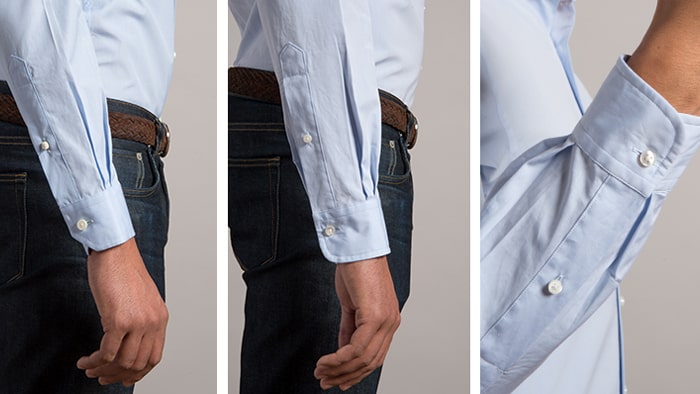
Sleeve Pleat…
Sleeve pleats are very subtle. 0.5″ fold of fabric at the cuff of the shirt is used to determine the rate at which the sleeve tapers from the bicep (sleeve width), through the elbow, and down to the cuff circumference. The number of pleats in the sleeve is controlled by the custom shirt size profile. There are different types of sleeve pleats such as 1-pleat, 2-pleat, 3-pleat and inverted pleat which are close to the sleeve placket. However, the manufacturers still have less understanding of which pleat should be used under which scenario.
Normally, 1-pleat method is widely used, but for the customers having big forearms, 2-pleat method is preferable. For example, a sportsman with slightly large forearms generally prefers 2-pleat shirt which gives him proper space for his wrist movement. On the other hand, 3-pleat shirt is designed for people (rock climbers, wrestlers) with particularly very thick forearms and biceps. It is important for people with thick biceps to have extra fullness and flexibility in their wrist and elbow movement which is achieved by 3-pleat design.
Moreover, it is observed that these pleats are not properly attached in a shirt as proper alignment of the fabric edge with the cuff edge is not done. The manufacturers need to learn that there should be any misalignment between fabric edge and cuff edge as well as no gatherings are allowed during stitching at the joining area in order to produce a quality shirt.
Furthermore, another important aspect to consider is the depth and the placement of the pleat. The position should be in the centre of the sleeve slit and when the wearer folds the sleeve, it should come in between the shirt slit. The second pleat should be on the half fold of the sleeve.
Placket attachment…
The shirt placket is a narrow strip of layered fabric that runs down the front of a men’s dress shirt. It serves three purposes: firstly, it plays the role of providing an aesthetically pleasing polish to the shirt front; secondly, it helps the shirt maintain its shape and structure, and thirdly, it serves as a foundation for the buttonholes. There are two main types of shirt plackets – front placket and sleeve placket.
Issues that occur the most while attaching plackets are:
a) The standard width of front placket is 2.5 to 3 cm, whereas as size enlarges, the placket width increases proportionally and it can go up to 4 cm. But, this standard of width is not being followed by the manufacturers, resulting in deteriorated quality as well as not-so aesthetically appealing shirt.
b) There are three types of alignment in sleeve placket: centre, half fold, and off centre. The correct and the most preferred way of placing placket is in the centre of the cuff which is again an area mostly overlooked by the manufacturers.
c) The shirt manufacturers also fail to address issues that occur due to the incorrect shank of the button. Minimum 2 to 2.5 mm shank is preferable which plays a key role in reducing the gap between front plackets. Secondly, button wrapping is again a significant aspect for button security. If proper wrapping is absent, shank becomes tighter which leads to the damage of the button.
Simply put, it is always advisable for the manufacturers to follow the standards in order to improve the functionality and design of the shirt as far as plackets are concerned.
Pocket attachment…
Pocket attachment operation may seem easy but it is a time consuming operation in a shirt. There are two ways of attaching a pocket in the shirt: (i) Start sewing from the front placket side, (ii) Start sewing from the armhole side. Generally, the first option is commonly used at most of the factories, because the specification mentions a reference distance from the front placket and the highest shoulder point.
Although, it is debatable which method is correct, starting sewing from armhole side could be technically correct. Because while sewing from armhole side, the operator rotates the material being sewn in anti-clockwise direction, which is the normal instinct of movement for any human being. If the pocket is sewn from front placket side, the operator has to rotate the material in clockwise direction, which is against the natural instinct of movement by any operator, whether he is right-handed or left-handed.